As part of my personal onboarding for Siemens MindSphere my first goal was to simulate a simple thing which delivers data to MindSphere. In this blog post I would like to demonstrate how you can create a simple NodeJS application for sending data to MindSphere platform. The code is available on GitHub.
Some Thoughts About the Demo Use Case
To keep things simple, the use case for the demonstration is to gather data related to a production hall. This could be necessary if you want to observe if the temperature in the production hall is within defined boundaries if temperature sensitive processes run there. The relevant data points for our sample are:
- Current temperature in °C.
- Current humidity in %.
Of course this is a really small and simplified use case - but it should be enough to demonstrate the basic mechanisms of how to connect something to MindSphere.
Get Access to MindSphere
The first step is related to preparation on MindSphere. Luckily we already had a mimacom tenant in place which is sufficient for the sample we are building here.
If you do not already have a tenant available, you can apply for a trial account on the MindSphere website. Please be aware that the process behind is most likely a manual one which is therefore not as fast as you are used to from creating an AWS account or similar. Another thing you should know is that the website says “If not canceled, the Developer TRIAL will automatically transition into a MindAccess Developer Plan S account”.
Prepare the Data Model
Once you have access to a MindSphere tenant, we can start with the data model preparation. Please log in to MindSphere now. A page similar to the one shown in the screenshot below should appear. One of the tiles offered in this dashboard is the Asset Manager, which is used to manage assets connected to MindSphere including their data model. Please open it.

Here we will start to create the data model for the sample use case. First of all we need to define the so called aspects. Such an aspect is a group of related attributes, which are called variables here. The aspect itself can either be configured as static or dynamic. Static means that the data won’t change over time and is therefore configured once. The dynamic setting is used for data which regularly changes and which is stored as time-series data. This is usually data which is sent to MindSphere from the thing itself or a gateway.
We need both types which means that it is necessary to create two separate aspects - a static and a dynamic one.
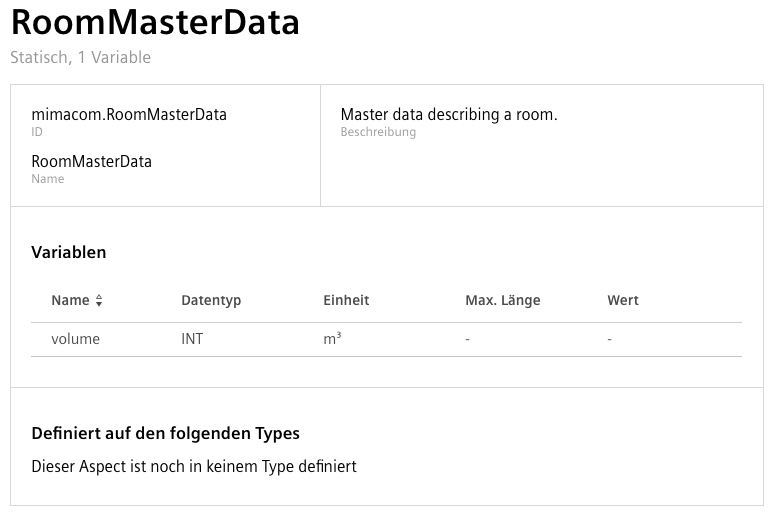
The static one RoomMasterData describes the static data related to a room which does not change over time.
The only variable we will consider here is the volume of the room which is configured as data type INT with the unit m³.
Please switch to the aspects section and click on the button which adds a new aspect.
Then enter the name of the aspect and a description.
After you selected the static category you should add a variable as shown in the screenshot below.
Now we need an additional aspect for the dynamic data of a room.
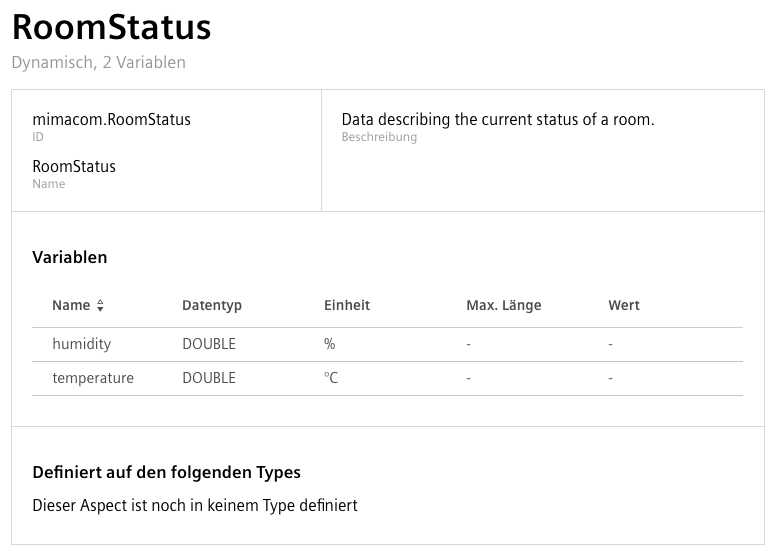
Please add another aspect, enter the name and the description as shown in the screenshot below and select the dynamic category.
Then add a variable humidity of type DOUBLE with unit % and another one named temperature of type DOUBLE with unit °C.
With both aspects ready we can now create a type which will represent our room.
A type is the blueprint of a concrete thing you would connect to MindSphere.
Please navigate to the type section and click on the button which adds a new type.
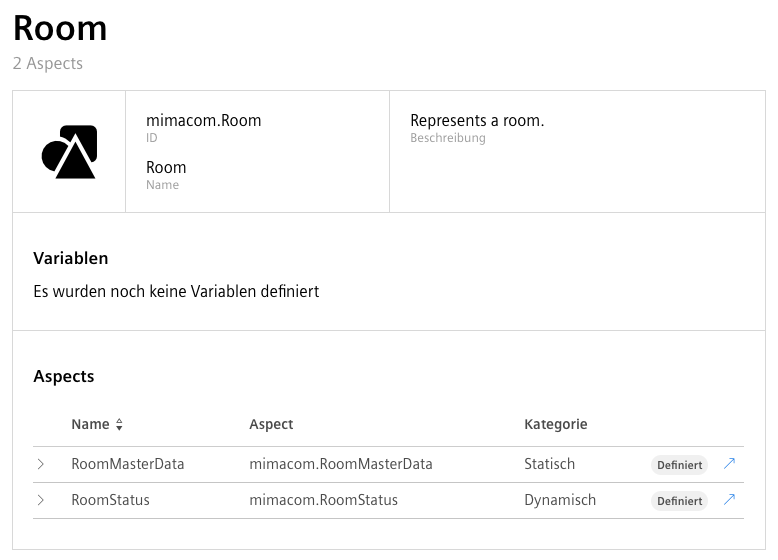
Enter a name and a description and assign the two previously created aspects to the new Room type like shown in the screenshot below.
Create the Assets
In the next step we create an asset representing a concrete room.
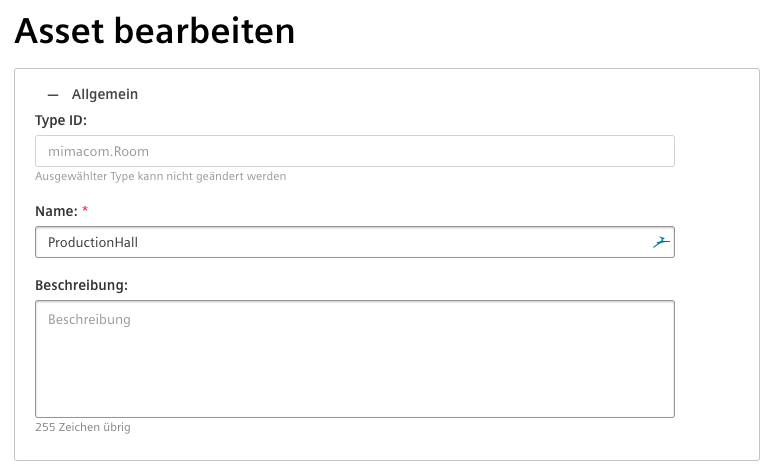
Please go to the assets section in the Asset Manager and add a new asset called ProductionHall of the type created in the previous step - which is mimacom.Room in my case as you can see in the screenshot below.
Now we need a gateway which sends data of this room.
For our demo we will use the MindConnect Lib which enables us to programmatically send data to MindSphere using a NodeJS application.
Please create a new asset of type core.mclib like shown in the screenshot below.
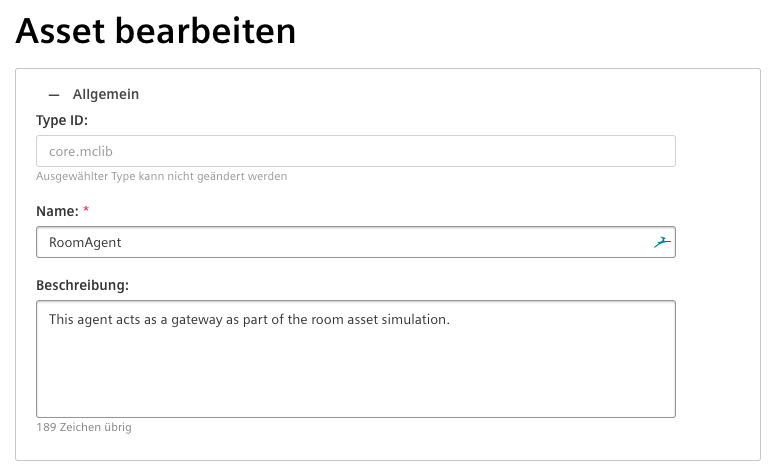
After this gateway was created, we need to further configure it.
Please open the RoomAgent asset and click on the tile labeled with MindConnect Lib.
If you do this for the first time, a wizard will automatically be started.
It takes care of generating a security profile for the asset.
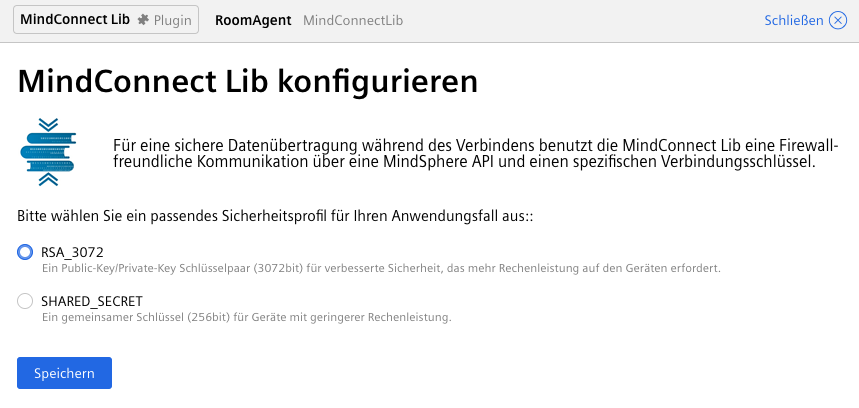
Please select the RSA_3072 option and save it.
This will bring you to the next page which is used to create the connection key.
Simply click on the button and some JSON data will show up in the text area on the left side.
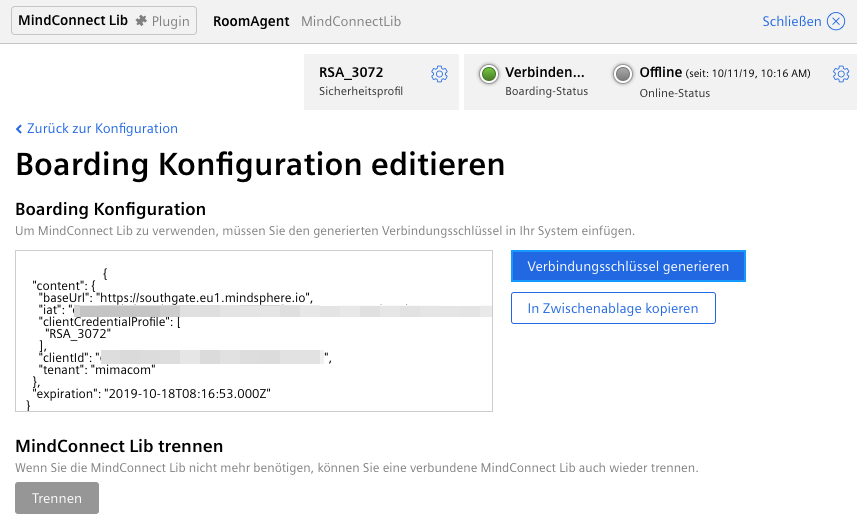
We will need this JSON data in a later step when we create the simulator project. Therefore copy the content of this text area and temporarily store it somewhere. You won’t be able to retrieve this config again. If you loose it, you have to generate a new connection key which most likely invalidates the old one.
Configure the Data Mapping
As next step we need to define the data mapping. To do this please open the MindConnect Lib plugin of the agent asset and add a new configuration. There we need to create data points for all variables of our aspects.

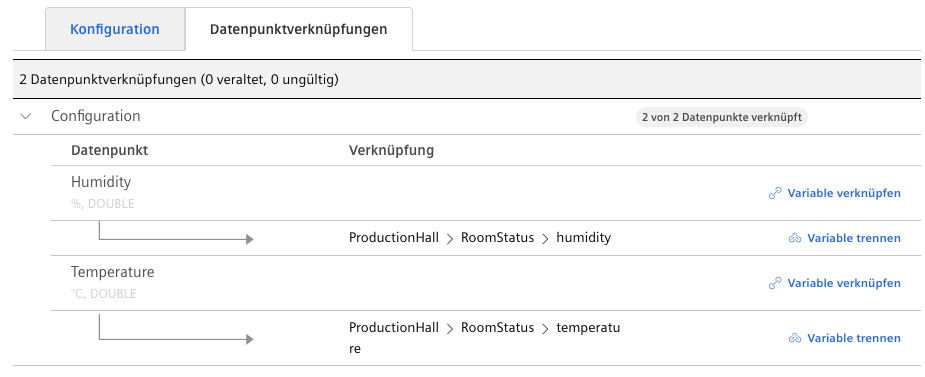
Once all data points are created, we need to map the dynamic ones to the corresponding variables of the ProductionHall asset we created earlier.
To do this please switch to the data link section and connect each data point to the corresponding variable.
Please note that you have to change the selected asset to the ProductionHall to find the correct variables.
Simulate an Asset
To simulate an asset we use the open source project MindConnect-NodeJS. It provides a command line interface we can use to generate a NodeJS project which delivers simulated data of an asset to MindSphere.
npm install -g @mindconnect/mindconnect-nodejs
Once installed, we can use it to generate the simulation project.
The command below generates a Typescript project we will use as starting point.
After running the command, a directory called starterts should be present.
It contains the Typescript project.
Therefore you should open it in your favorite IDE.
mc starter-ts
cd starterts
npm install
The generated project already contains some code which serves as a starting point.
A package.json file was provided which includes the necessary dependencies and defines the npm run start command which will be used to run the simulator project.
The index.ts file contains the simulation logic and is responsible to send defined data to MindSphere.
A more detailed description of what happens there is provided in the [GitHub repository of the MindConnect-NodeJS project][github-nodejs].
As a short summary it does the following things:
- Take care of onboarding the asset during the first connection.
- Send single data sets.
- Post an event.
- Send data sets in batch mode.
To customize the generated skeleton, we first need to put the agent connection configuration to the file agentconfig.json.
This is the data we temporarily stored somewhere when we created the RoomAgent asset in the Asset Manager.
After this is done we need a private key, which will be registered with the agent when the first connection from the simulator to the agent asset is done.
Please make sure that you have openssl installed and execute the command below in the root directory of the project.
It generates a private key and stores it in the private.key file.
openssl genrsa -out private.key 3072
This generated private key file needs then to be referenced in the index.ts file.
Please watch out for the first line of the code below and add the second line in your file.
This command registers the certificate you generated before.
const agent = new MindConnectAgent(configuration);
agent.SetupAgentCertificate(fs.readFileSync("private.key"));
Now we need to configure the data we send from the simulation project.
There is a pre-generated section in the code which needs to be adjusted to what you see below.
First we take care of the single data sets sent to MindSphere.
Please adjust the data like shown in the snippet below.
The numbers used as dataPointId need to be looked up in the Asset Manager.
You can find them in the configuration of the RoomAgent asset.
const values: DataPointValue[] = [
    // 1570783881302 -> Temperature
    // 1570783864134 -> Humidity
    {
        "dataPointId": "1570783881302",
        "qualityCode": "0",
        "value": (Math.sin(index) * (20 + index % 2) + 25).toString()
    },
    {
        "dataPointId": "1570783864134",
        "qualityCode": "0",
        "value": ((index + 30) % 100).toString()
    }
];
After that we need to search for a snippet similar to the one below. Please adjust the IDs there as well and specify the values you want to sent for those data points.
// 1570783881302 -> Temperature
// 1570783864134 -> Humidity
const bulk: TimeStampedDataPoint[] =
[{
    "timestamp": yesterday.toISOString(),
    "values":
        [
            {
                "dataPointId": "1570783881302",
                "qualityCode": "0",
                "value": "10"
            },
            {
                "dataPointId": "1570783864134",
                "qualityCode": "0",
                "value": "30"
            }
        ]
},
    {
        "timestamp": new Date().toISOString(),
        "values": [
            {
                "dataPointId": "1570783881302",
                "qualityCode": "0",
                "value": "10"
            },
            {
                "dataPointId": "1570783864134",
                "qualityCode": "0",
                "value": "30"
            }
        ]
    }
];
Now setup and customization of our simulator project is done.
Send Simulated Data
We can now run the simulator project to send simulated data of our production hall to MindSphere. To do this you need to run the command below in the root directory of the project.
npm run start
This should show some console output which describes what was done. The simulator application will execute all actions five times.
Once this finished, you can go to the Fleet Manager MindSphere application, which should be visible on your Dashboard when you log in to the MindSphere portal.
There you can select the ProductionHall asset and show the data received.
If you don’t see the tabs you see in the screenshots, please click on the plus icon and select the data you want to show.
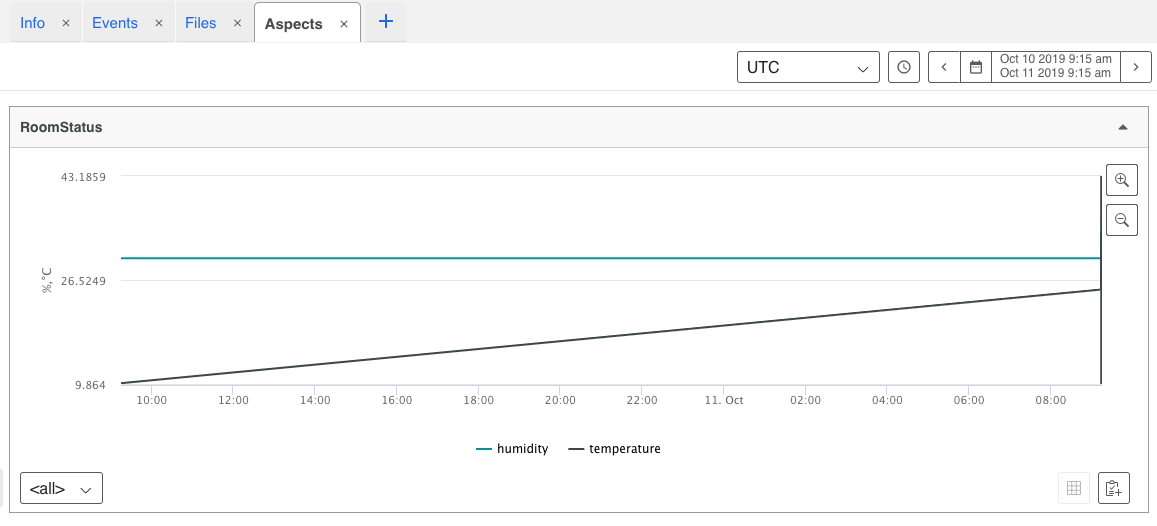
On the ProductionHall asset you can see data related to temperature and humidity, but not the uploaded file or the event we sent.
The reason for this is that we send all data to the RoomAgent asset which is the gateway.
Therefore all data is tied to the agent.
By mapping the data from our RoomAgent to our ProductionHall asset, we created a link between them.
This causes the data to be forwarded to the ProductionHall asset.
The file and the events are visible in the RoomAgent entry in the Fleet Manager.
This means that both screenshots below do not refer to the ProductionHall asset but to the RoomAgent.


Conclusion
In this blog post we had a closer look at how we can get started with MindSphere. We used a simple use case to get familiar with data modeling on MindSphere and how we can send simulated data. Doing this we already touched the Asset Manager and Fleet Manager applications which are offered by MindSphere out of the box.
If you are interested to check this out yourself, you could create a trial MindSphere account. But please be aware that getting such a trial account could be a bit cumbersome and time-consuming since it seems to be a manual process.
The code of the simulator project is available on GitHub.
You could use it but keep in mind, that you would have to provide a valid agentconfig.json file matching the configuration you have to do in the MindSphere UI.
You will also have to create a private key and store it as private.key.
Leave A Comment
I'd love to hear your opinion and experiences. Share your thoughts with a comment below! Please note that comments will appear after moderation.